The records of received invoices provide an overview of liabilities to suppliers and at the same time ensure correct accounting documents. It allows you to track the number of unpaid invoices, invoices awaiting payment and invoices already paid.
We can register received invoices in Mango in three ways:
- by manual data entry - via the plus button,
- by uploading a PDF invoice using artificial intelligence
- by completing the order placed and subsequently issuing the invoice received.
1. Manual recording of received invoices
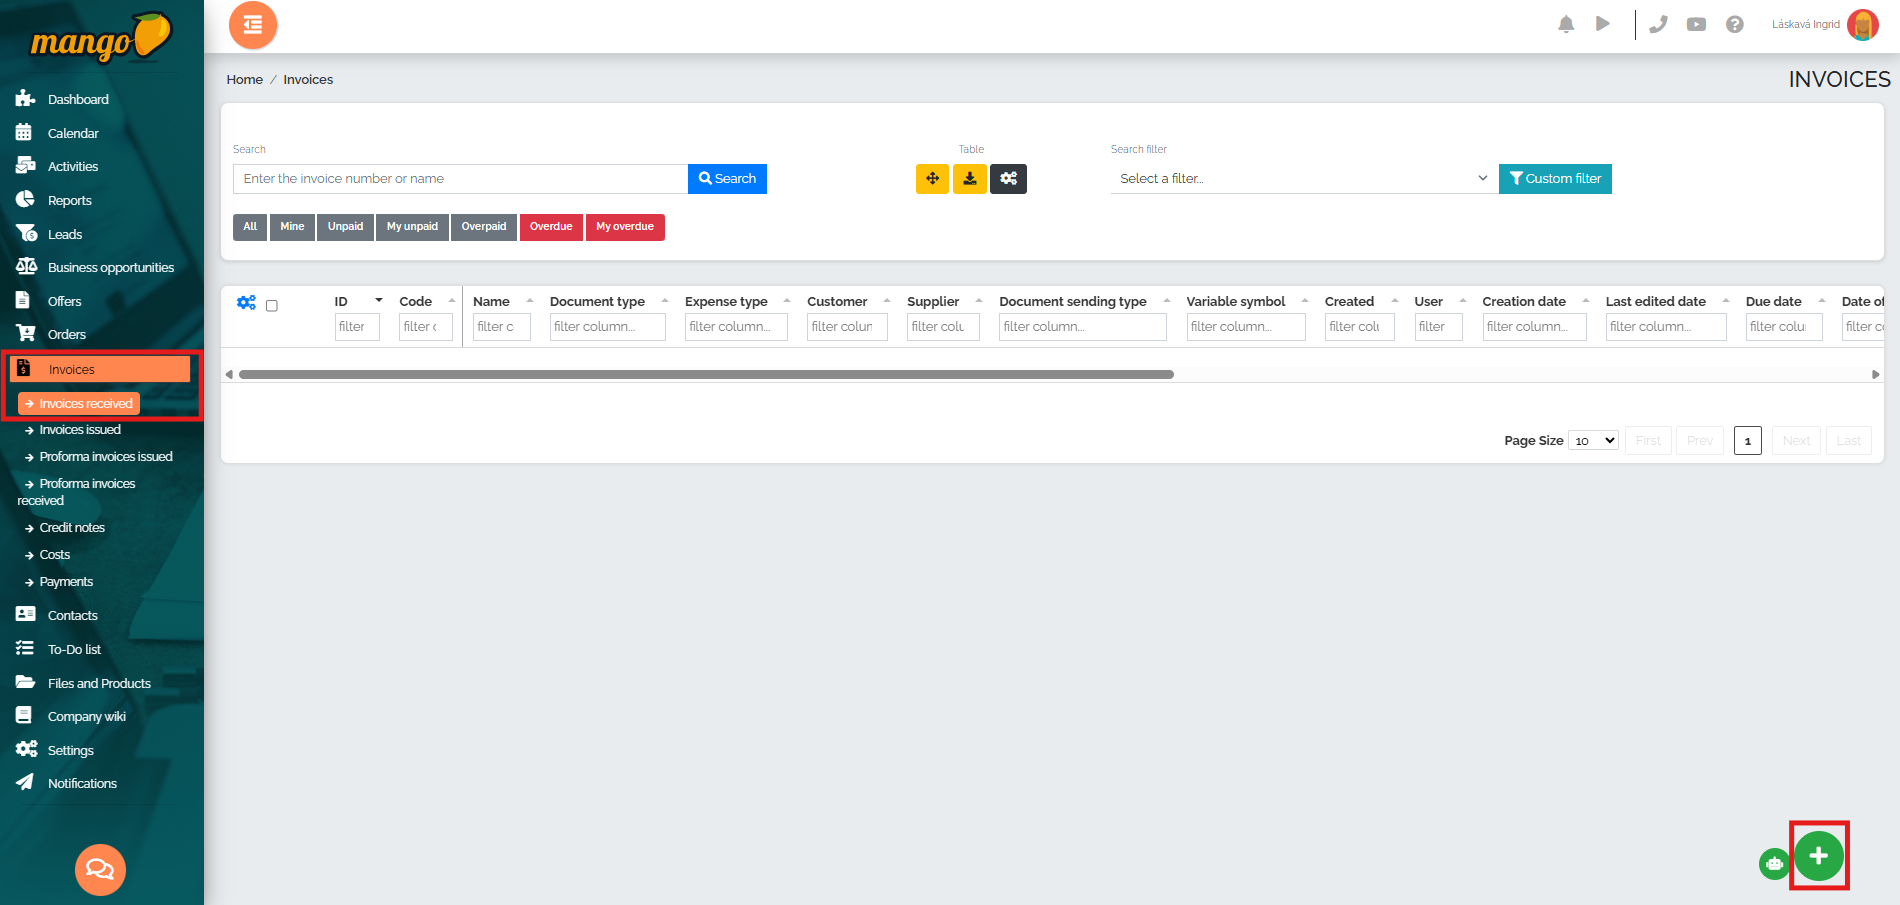
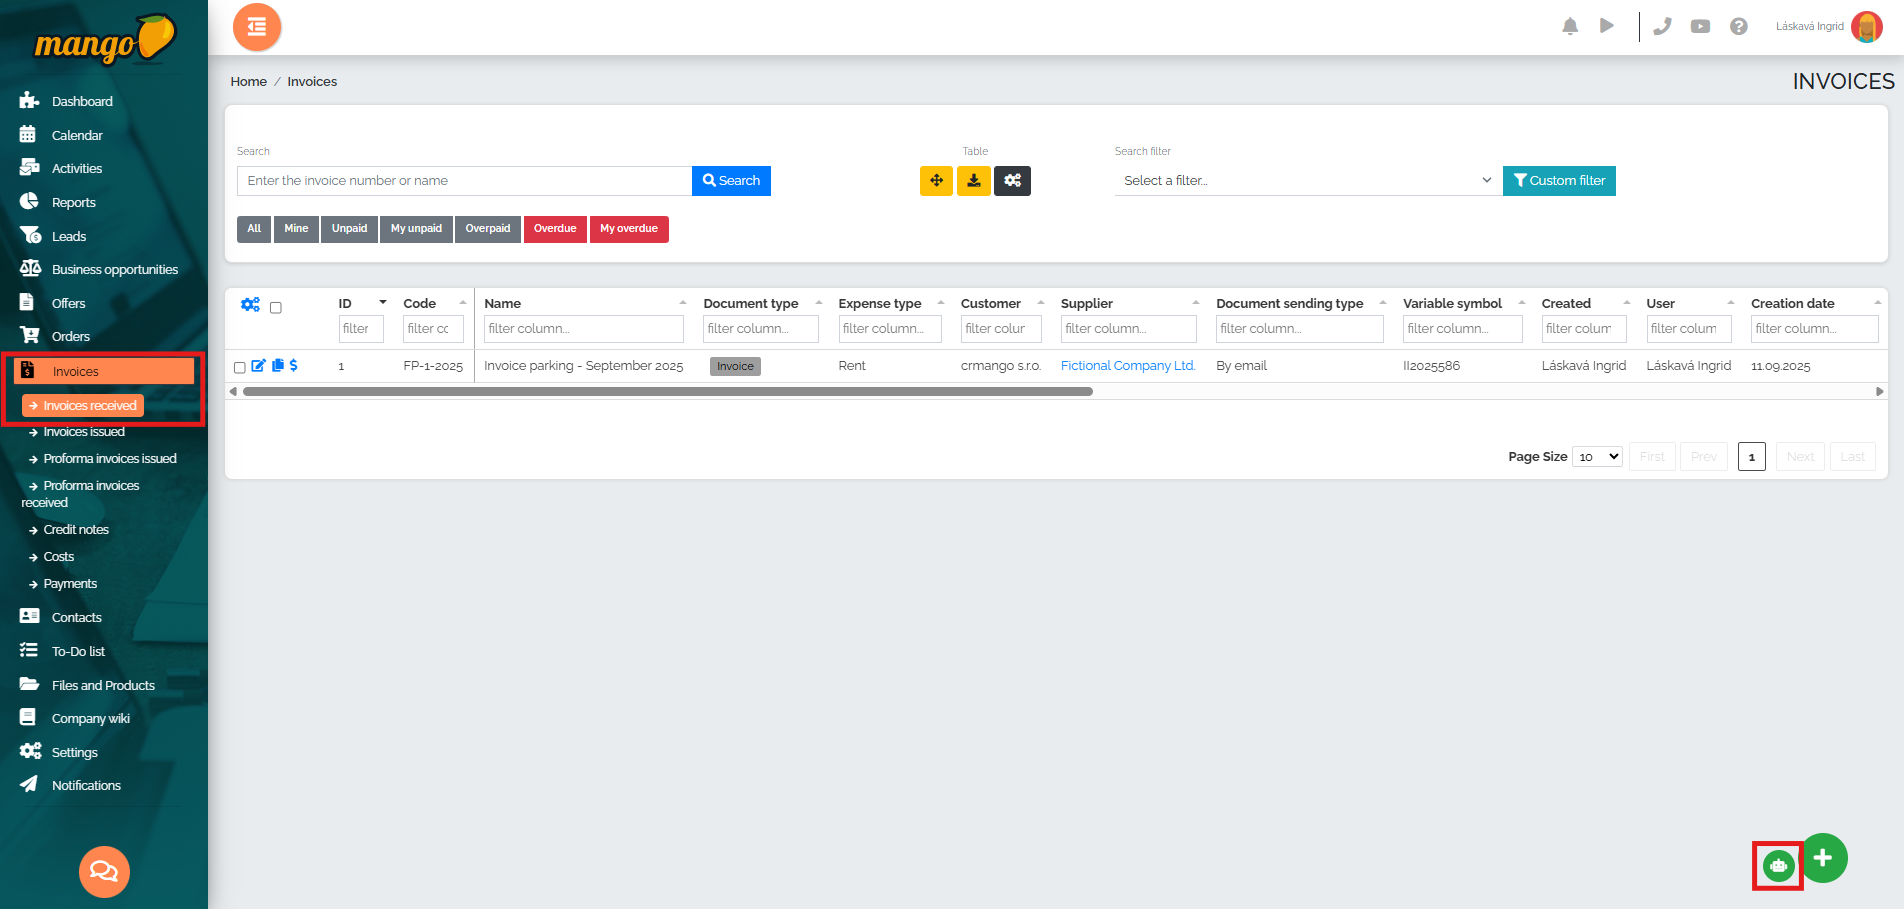
The first way to issue an invoice received is manually. We move to the Invoices section and select the Invoices received option. In the lower right corner of the screen, click the green plus button:
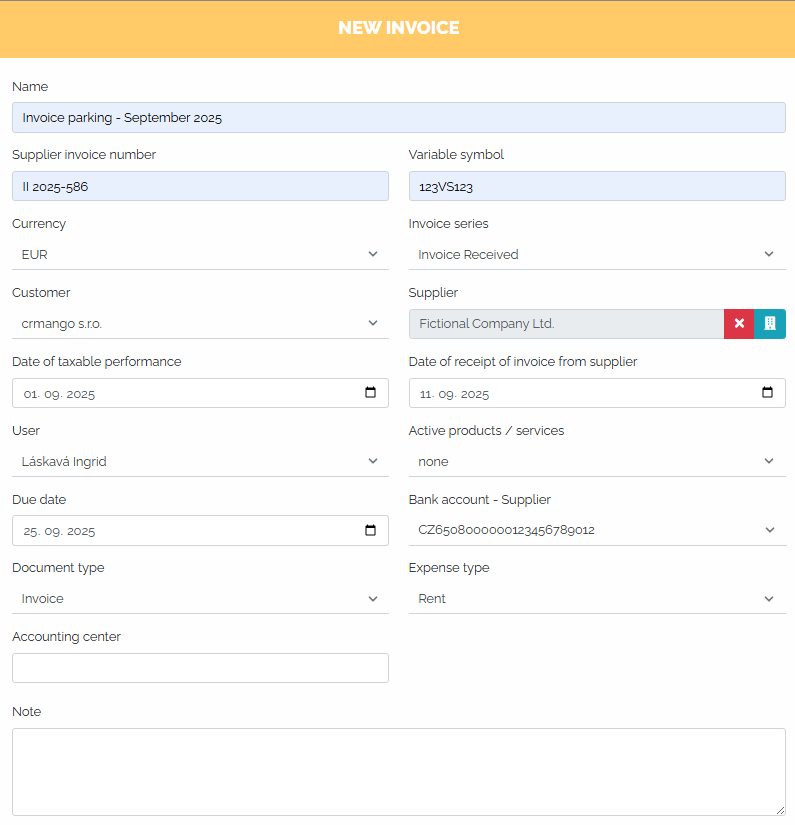
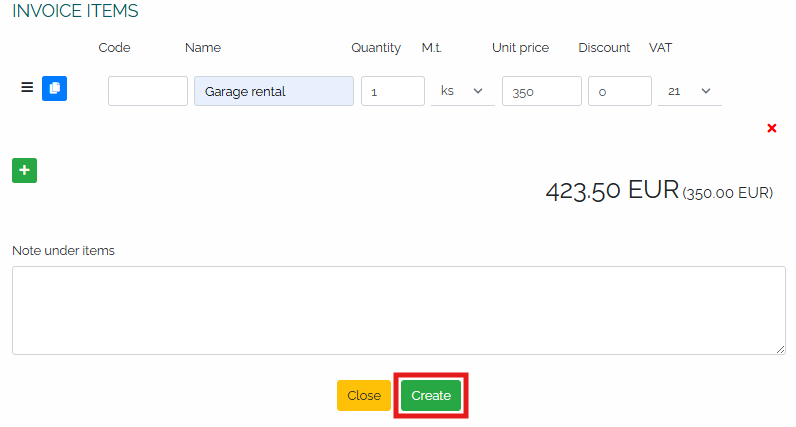
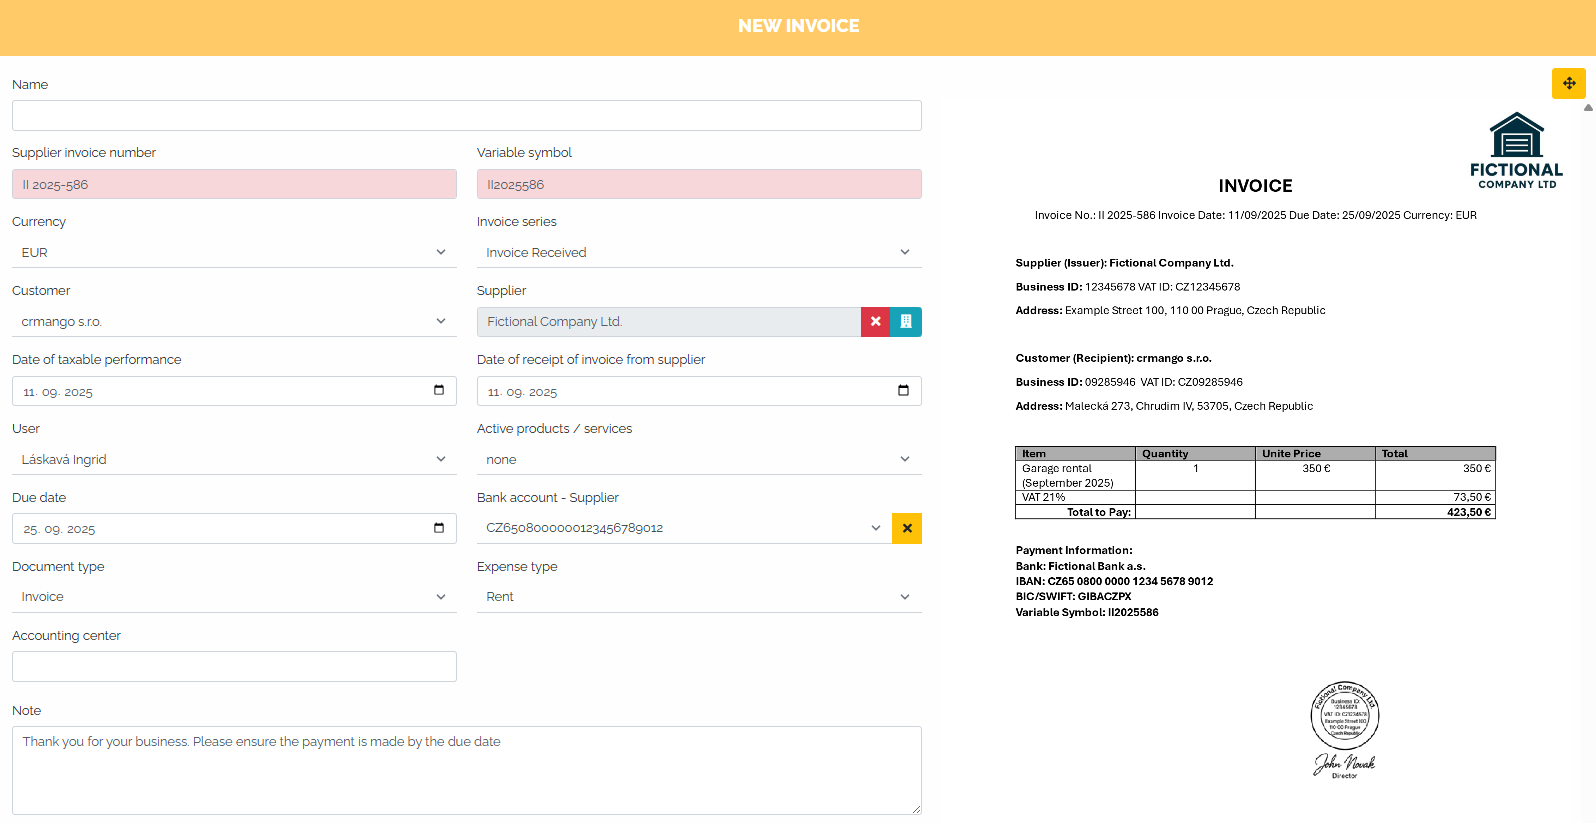
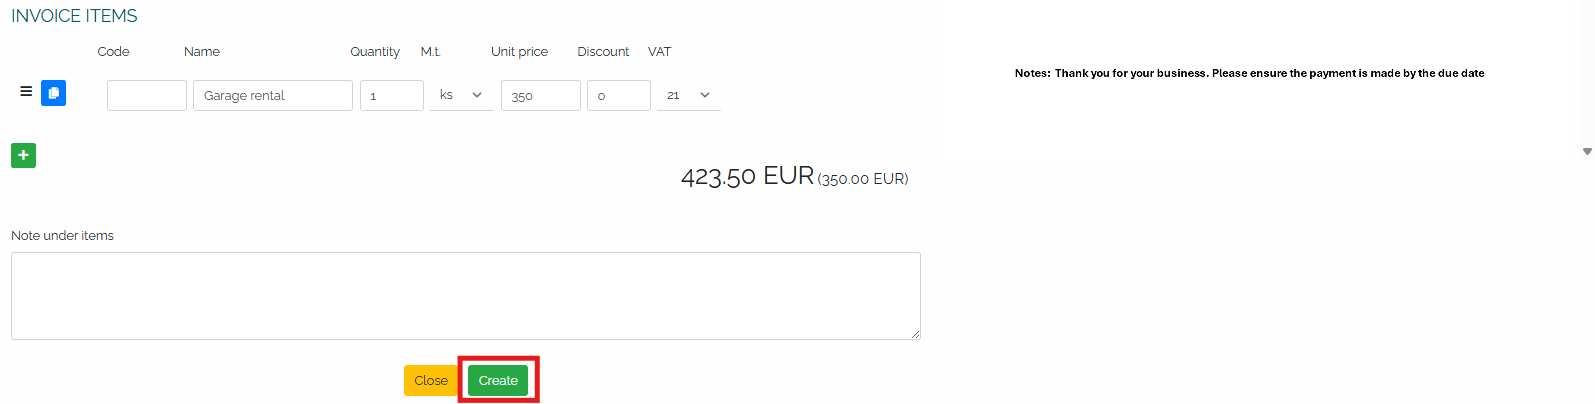
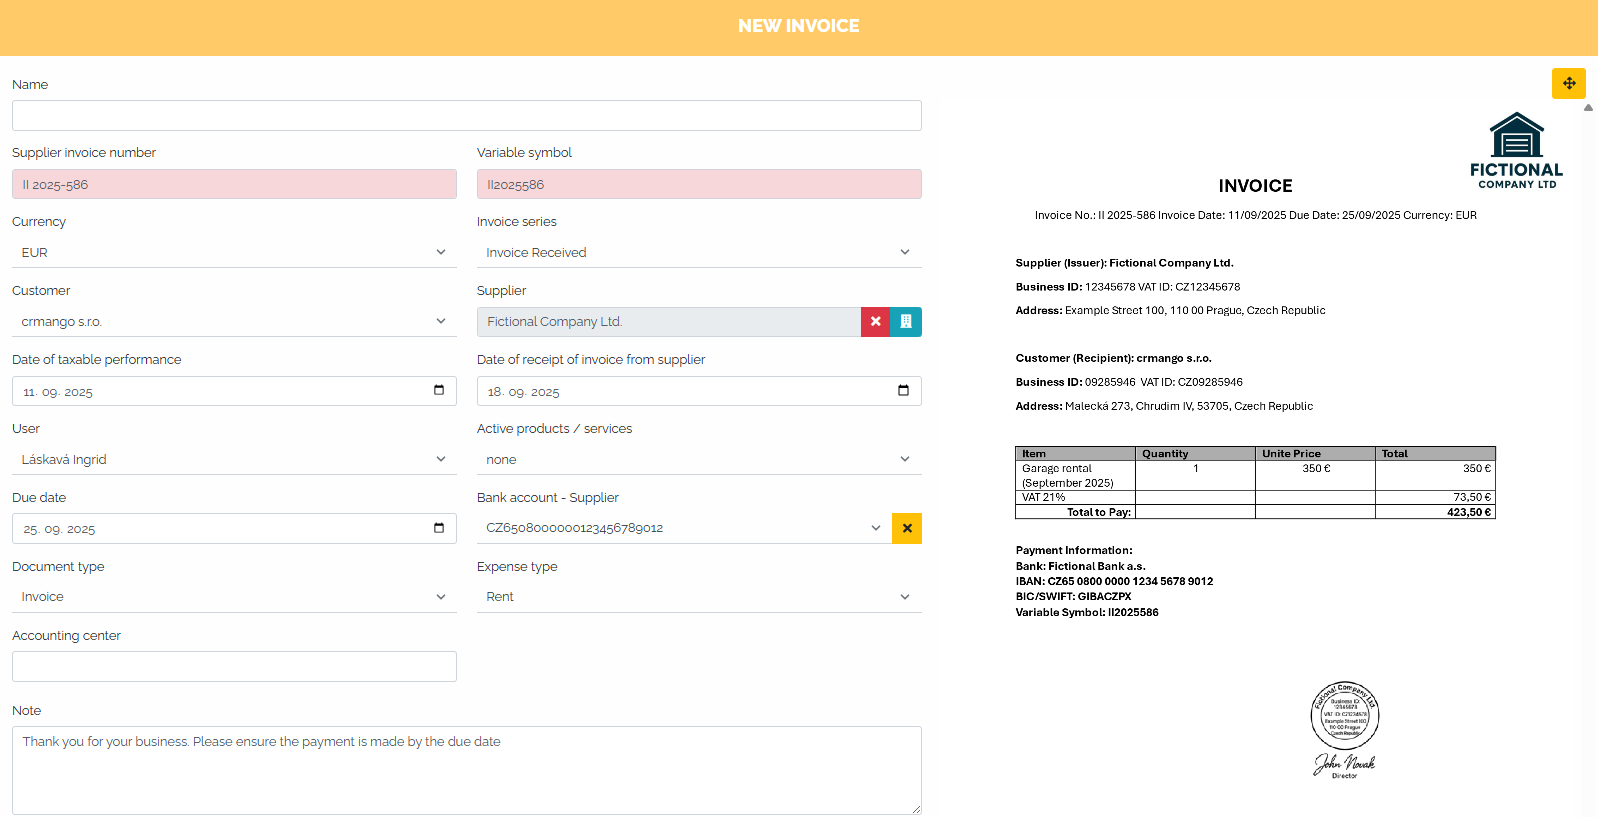
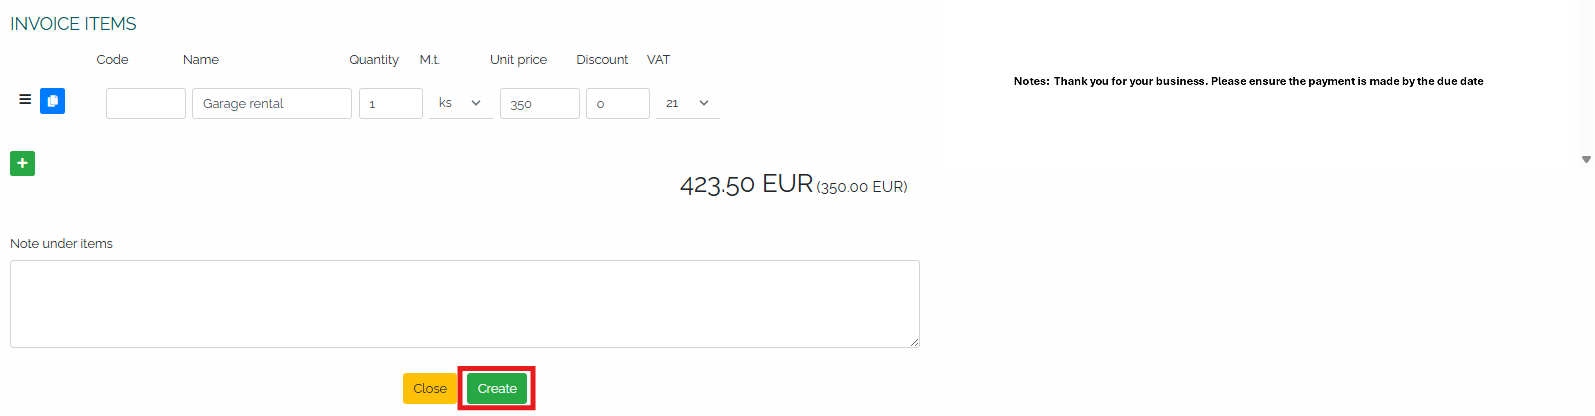
In the next window, fill in all the important details of the invoice - name, supplier invoice number, variable symbol, currency, invoice series, customer, supplier, date of taxable performance, date of invoice receipt, due date, bank account, type of expense, invoice items with prices, or add a note. Finally, register the invoice by pressing the Create button:
After saving, we see the invoice registered in the list of our received invoices:

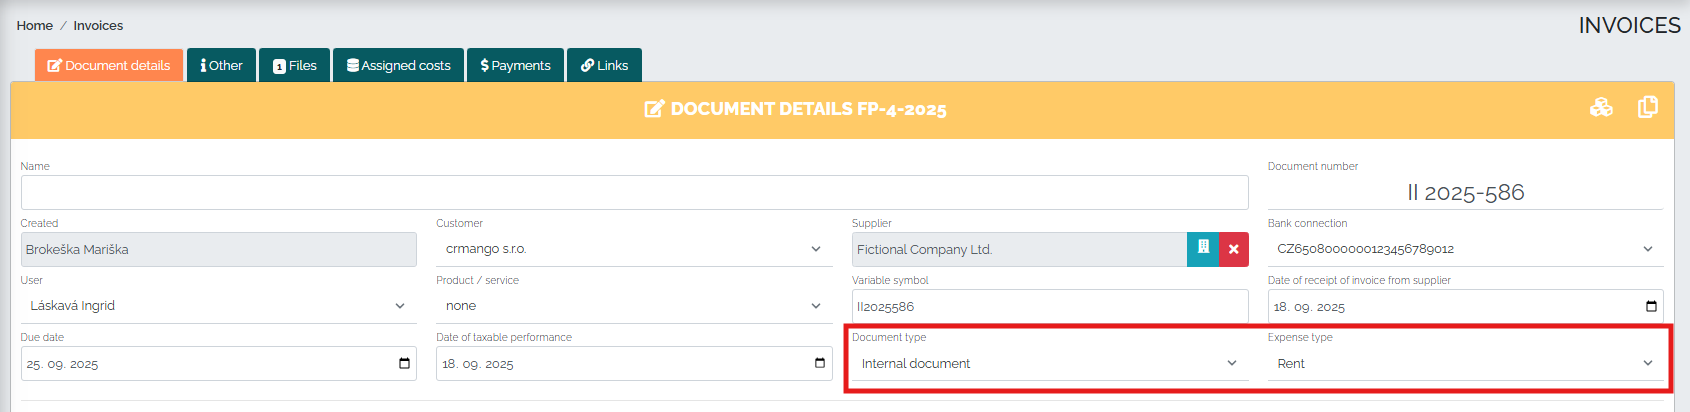
Within received invoices, we can also record the document type and expense type in more detail. After entering both of these values, they are displayed in the invoice table view, and we can edit specific types in the record details - so we click on the pencil icon and open the given invoice:

In the image below we can see the invoice detail, where in the first field we can edit the Document Type (Not set, Invoice, Cash Book, Internal Document, Other) and in the second the Expense Type (Unclassified, Fuel - Fuel, Wages, Repairs and Maintenance, Material, Rent, Insurance, Services, Travel Expenses, Advertising and Marketing, Other, Office - Equipment).
2. Recording of received invoices using artificial intelligence
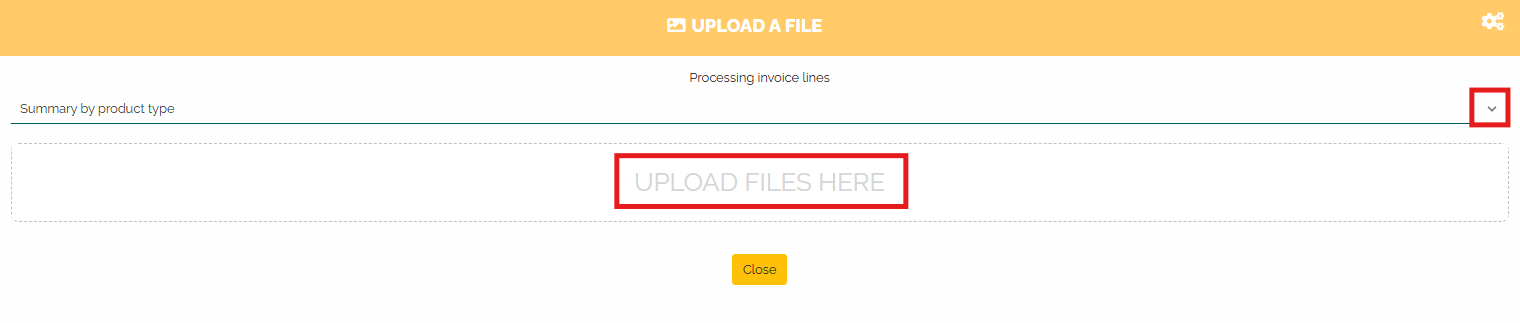
This method of recording received invoices is very simple. We are again in the Invoices section, the Received invoices option and in the lower right corner we click on the green robot icon :
A new window will then open, where in the first line we will select the option to process invoice lines - we have 3 options to choose from: 1. Summary by product type, 2. Only one summary line or 3. All products from the invoice. By clicking on the field marked in red, we will insert the invoice from our storage - in our case we will insert the invoice in PDF format:
After inserting the document (recommended formats are PDF, .jpg, .png), we will see a preview of the newly created invoice, which Mango has read with the help of artificial intelligence and filled in the individual fields with data from the original invoice. Of course, it is necessary to perform a data check, as artificial intelligence may incorrectly decipher some items or numbers. In the right part of the window we can see the original version of the invoice:
After checking, we can conclude that the data was loaded correctly and register the invoice by clicking the Create button.
In addition to this method, we can also record incoming invoices by importing invoices. This way, we can conveniently transfer all received invoices that we have concentrated in one email box. In this case, it is necessary to have the Automated Email Processing module activated, which can be found in the Settings -> Extension Modules -> Automated Email Processing section:

By clicking on this module, we will get to the module settings. Here we click on the option Task active and at the same time we see the automatically generated email address. It is necessary that all received invoices go to this email and then they will be synchronized directly in Mango:

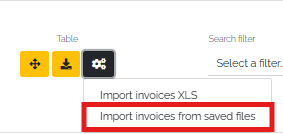
In practice, it works as follows: Open the Invoices received section and click the gray settings icon at the top, as seen in the image :

If we want to find these synchronized invoices, we select the Import invoices from saved files option:
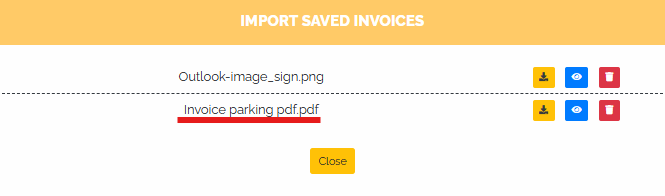
Within a few minutes, all incoming invoices will be loaded and we can then continue working with them - we can view, download or delete them.
Click on a specific invoice and a window will appear where you can choose how Mango should process the lines in the invoice. You can choose from the following options: 1. Summary by product type, 2. Only one summary line, 3. All products from the invoice. Select one of the options and click the Continue button:

In our case, we chose option 3 - all products from the invoice. The invoice will then be loaded, along with a preview.
If necessary, we will register this invoice using the Create button. Since this is the same invoice that we have previously registered manually, there is no need to save it duplicated (the system itself will notify us that this is an invoice with the same variable symbol and supplier invoice number).
3. Issuance of an invoice received upon completion of the order issued
In the Orders section, go to Orders issued and find a specific order in the list and click on the pencil icon :
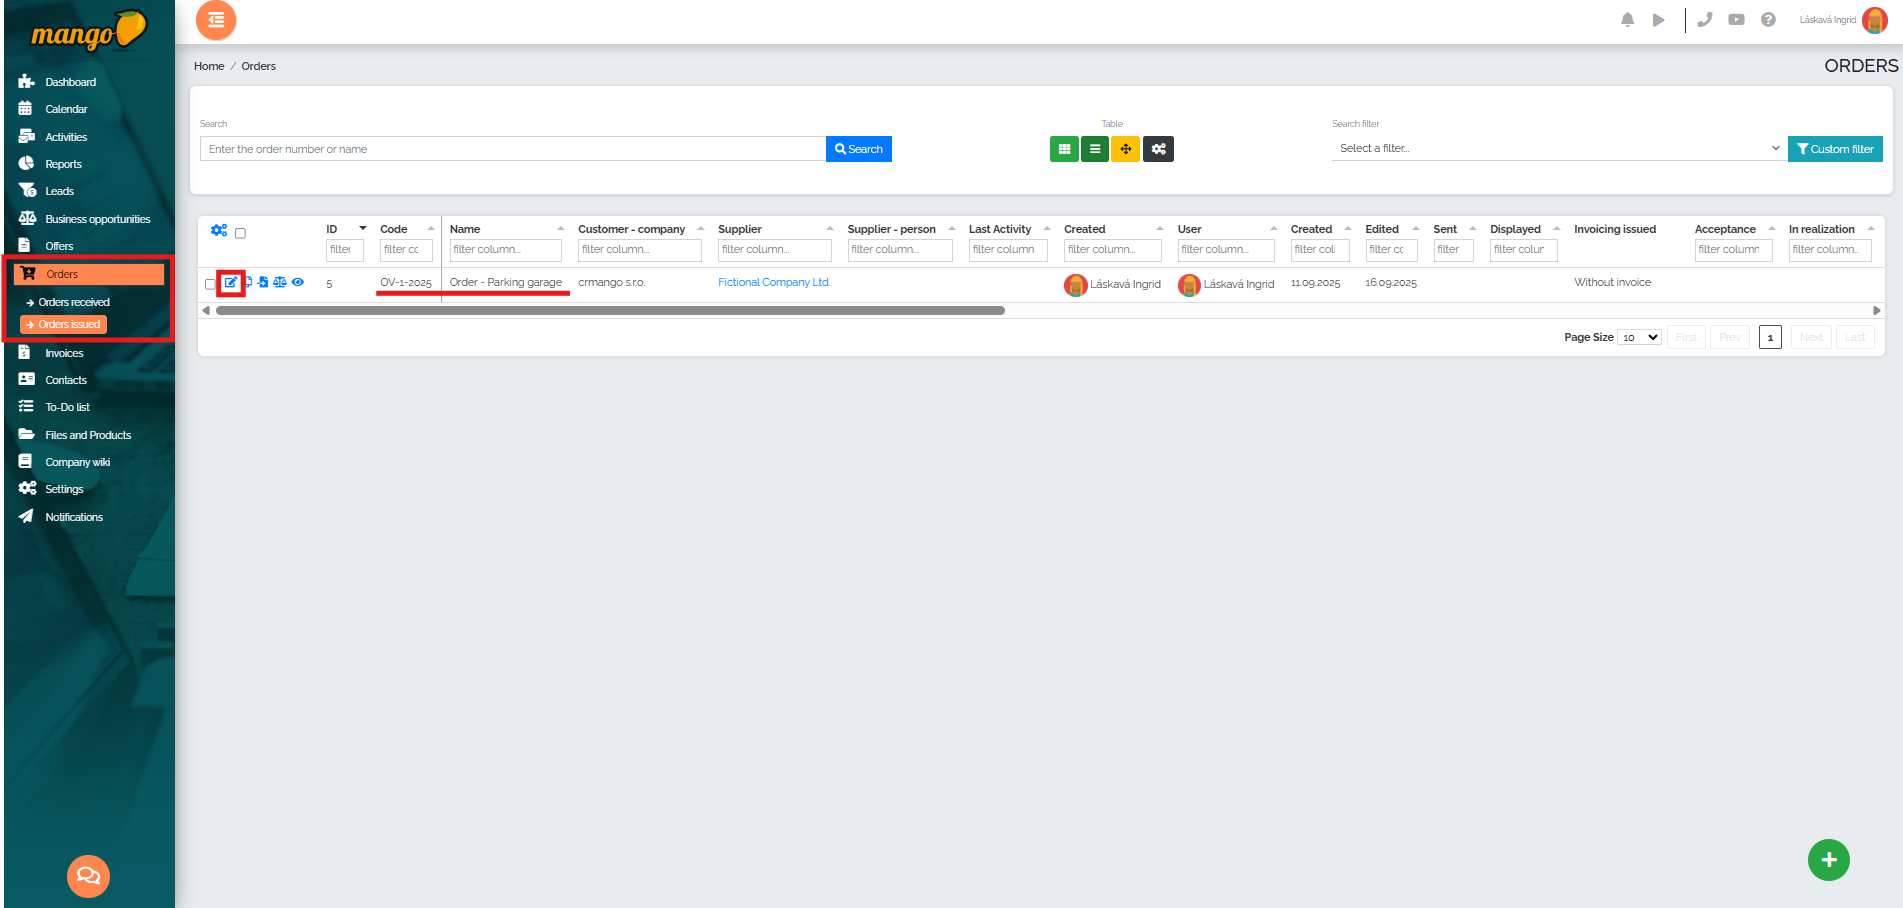
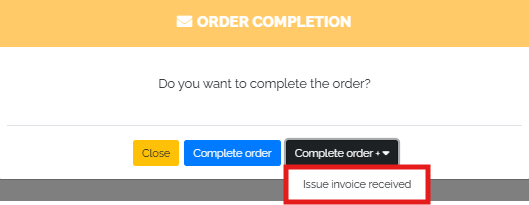
The order details will then open and when we have checked all the data, we click on the last point of the so-called order timeline - Order completion : 
The system will then offer us several options - and we will select Complete order + Issue invoice received :
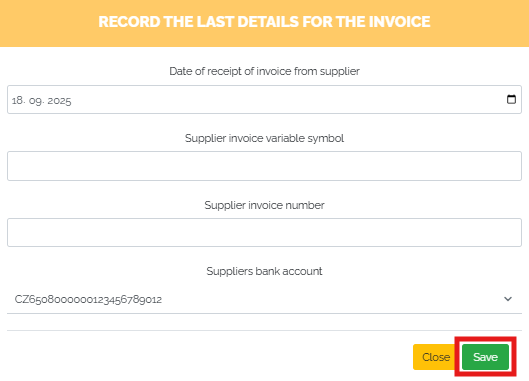
In the next step, we have the option to set the date of receipt of the invoice from the supplier, the variable symbol of the supplier invoice, its number and the suppliers bank account number, and save the changes by clicking the Save button:
After saving, we can see in the order details, in the Links tab, that an invoice is linked to the given order - its number, amount, and it is also possible to edit this invoice directly by clicking on the blue pencil icon:

We can also proceed in this way in the case of advance invoices.
In the Settings - CRM Settings - Invoices tab, we can set the date from which CRM Mango should calculate the due date of a received invoice, with two options to choose from - invoice issue date or invoice receipt date.